


AutoSmart Parts
Split Charge Relay Kit 12V 140A, Voltage Sense Dual Battery for Camper Van and 4x4
Running a fridge, lights or pump from your leisure battery without draining the starter? This 140A split charge relay senses the engine running and charges both batteries automatically.
Regular price
$149.99 AUD
Regular price
$170.00 AUD
Sale price
$149.99 AUD
 Secure shipping
 24/7 support
 140A intelligent voltage sense for canbus vehicles
No ignition feed wire needed, install in minutes
Isolates leisure battery so starter battery is never drained
Complete kit: relay, cables, fuses, terminals, fittings
Quantity
Couldn't load pickup availability
Specifications
Specifications
Compatible With
Compatible With
What’s Included / Care Instructions
What’s Included / Care Instructions


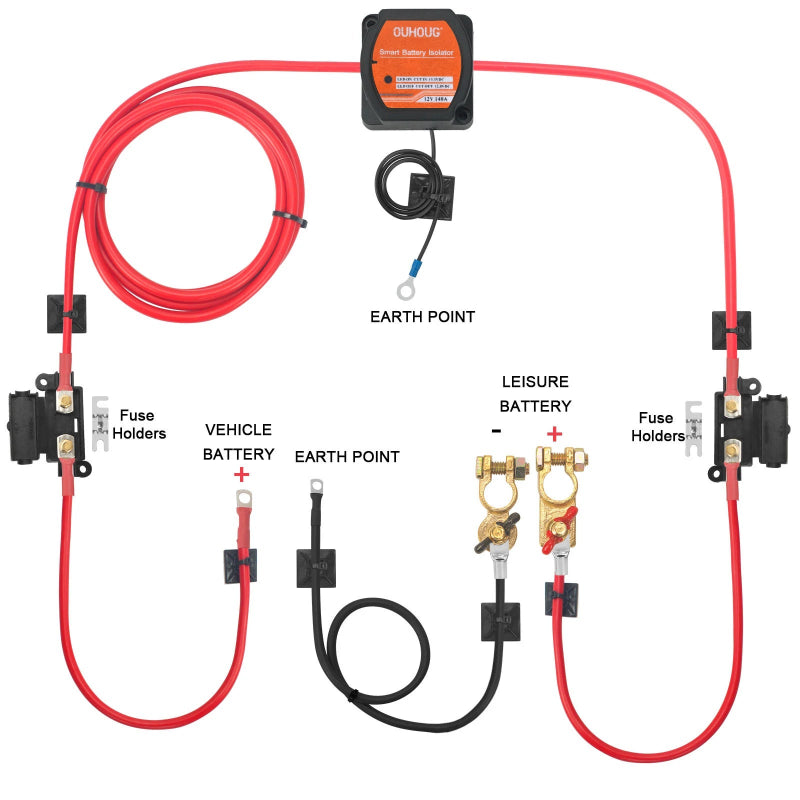
Install Guide
1. Disconnect Batteries
Disconnect both starter and leisure battery negative terminals before any wiring work.
2. Mount Relay and Run Cables
Mount the relay roughly midway between the two batteries. Route the red 70A cables from each battery (via the inline fuses) to the relay terminals. Connect the earth cable to chassis ground.
3. Reconnect and Test
Reconnect both batteries. Start the engine and check the relay engages (LED variant lights up). Stop engine and confirm relay drops out, isolating the leisure battery.
Common Questions Before You Buy
What does intelligent voltage sense mean?
The relay detects rising voltage from your alternator (above about 13.3V) when the engine runs, then connects both batteries so they charge together. When voltage drops (engine off), the relay disconnects, isolating the leisure battery.
Will it work on a modern canbus vehicle?
Yes, this is specifically designed for modern canbus controlled wiring. No ignition feed wire needed, so no risk of error codes or fuse problems.
Which cable length should I choose?
3m for compact installs (engine bay to underseat battery). 5m for larger vans or 4x4s with battery in the boot. 7m for camper vans with the leisure battery far from the alternator.
What's the LED indicator for?
The LED lights up when the relay is engaged (both batteries connected and charging). Handy for monitoring the system, but optional. The no LED variants work the same way without the visual indicator.
Is the leisure battery included?
No, this is the relay kit only. Pair it with any deep cycle leisure battery (sold separately). Lead acid AGM is most common, lithium LiFePO4 also works well.